The computers available now are unbelievably fast while comparing with PCs available 10 or twenty years ago. However, these computers can become faster after some tweaks. Now, this statement will have to make any tech-loving person interesting in over-speeding the CPU. Users can easily follow some steps to over-clock their Intel Processor and thus increase the speed of CPU.
Contents
What is Overclocking?
Overclocking the processor is the process of boosting user’s CPU core clock beyond the factory settings. This was allowed since the beginning of the personal computers era. However, earlier the process and tools required makes it somewhat difficult for users to do it. But now it is very much easier to overclock the processor.
However, before starting to learn about over-clocking the CPU, there are some basic principles that users need to know. The first and main principle is the heat. It is one of the most important things while considering a processor. As, the more voltage that user will add to its processor’s components, more heat will be produced by the processor. Next important thing is the voltage. In order to achieve higher clock speed, the user will have to provide more voltage to power the processor. The third and last thing is the maximum voltage that the PC can take before starting to see the effect. If more voltage is applied it may cause a drop in frame rates for GPUs. This can also corrupt the processes that CPU is currently working on. It can even also cause a failure in booting of the PC.

These are the basic limits of overclocking. All chips are born equal. They have same properties and speed. The difference in speed comes during the manufacturing process. Some small imperfections in the application of the silicon in the processor lead to some difference in its performance. This will cause some variations in stability with an increase in voltage. It will also cause variations in the amount of heat it will produce at the maximum load. Now, keeping this all in mind, let’s look into details on how to overclock an Intel Processor.
Step I: Picking the right hardware combination:
One of the main task before starting overclocking of a processor is making sure that user has the right processor. If the user has already bought or built (assembled) the PC, then overclocking the CPU is not allowed. However, it will be good for users to know about their system hardware’s limitations.
Processor:
Intel offers a large variety of Processors for its customers. However for overclocking, the K- and X- series processors are good. Here, K is not an actual product line, rather it is just a variable. It simply signifies that the processor is unlocked and it can be easily overclocked by the user. There is also option to overclock i7, i5 and i3 models and all the new and powerful X-series processors also come unlocked. So the user has a good list of processors to select from.

Now, what if a user wants to overclock a non-K-series Intel Processor. It is sometimes harder to overclock a non-K-series processor. The user will also need some support from their motherboard manufacturer. Also, Intel has closed the previously available loopholes that were used to enable overclocking through an update.
Motherboard:

Next is selecting the best motherboard for the purpose. The user will have to make sure that the selected motherboard is up to the required standards. In technical terms, any motherboard can help users to overclock the processor speed. However, some motherboards are specially designed for a particular processor while some are not for the same processor.
CPU Cooling:

One of the most important task in order overclock an Intel Processor is selecting the best CPU cooler for the PC. Some Intel Processors comes with inbuilt CPU cooler, however, these are much more powerful and efficient. These CPU coolers have bigger fans and expanded heat sinks. Users will get very amazing options for CPU coolers in the market. The most important thing that user should keep in mind while selecting CPU cooler is that it needs to support the socket of the motherboard that user selects.
Step II (a): Changing the settings of the BIOS:
A user will have to set everything relating to their CPU settings to default. Users can easily change the settings to default going to the BIOS Settings during the time of boot and then changing the settings to default. They will have to restart their PC and pressing Escape, F1, F2 or similar button depending on motherboard manufacturer when the manufacturer logo will appear on the screen. In the BIOS Settings, the user will get the option to change the settings to default.

The user will also have to disable the Intel Turbo Boost option for each of the 4 cores in the chip. Intel Turbo Boost is Intel’s in-built semi-overclock that will boost the clock speed of the CPU while some intense and big processes are going on. Although it is a handy feature, a user can extend the speed that Turbo Boost will give. The user will also have to disable the C-state option or any other power saving tools depending on the processor of the PC. These power-saving tools often under-clocks the processor speed while processor’s full power is not needed. The user can turn them ON after finishing the overclocking process.
Step II (b): Testing the setup in the best way possible and in stress conditions:
After everything is set to default, the user will have to boot into the main Operating System. Now the user has to stress test the system to get a benchmark before overclocking the processor. The user has to run something that will perform at the maximum level and utilizes CPU and its components at best. They have to stimulate the most intense possible usage of the computer in order to check if it will cause a crash in the system.
There are various tools that users can use for stress testing. Some of the popular stress testing tools are Prime95, AIDA64, LinX, and IntelBurnTest. Users can download then install and finally run use any of the above tools for stress testing. They can even use two tools at a time for stress testing. At first, it will run some initial tests, following some re-tests few times until CPU can handle 100% usage and maximum heat.

While stress test is going on, the user can download some other tools that will be required later. First of all, the user should download a CPU information tool to check for the change in any values. Next one is a CPU temperature monitor that will check for the heat. For Windows Operating System user can download CPU-Z and RealTemp for the purpose.

The temperature will be the most crucial aspect for the overclocking process. At times the temperature of the CPU may rise to about 45-55 degrees Celsius. But the user doesn’t have to worry as CPU are designed to work under extreme temperature conditions.
Step III: Raising the CPU Multiplier:
Now after the stress test, it is time to start the process of overclocking. The user will have to reboot the system and go back to the BIOS Settings. Then, the user has to search for the Overclock Settings. It may also be labeled as CPU Booster or something else depending upon motherboard’s manufacturer. In that section, the user has to look for CPU Clock Ratio settings. The user can easily Google with their manufacturer’s name and the UEFI version number to know about how to go to these settings.
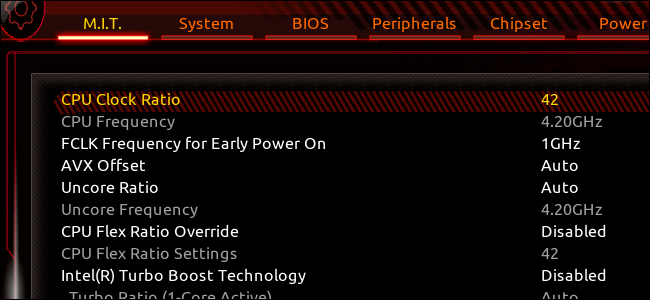
The user can check their system’s clock speed by multiplying the bus speed and the clock ratio also known as the multiplier. In order to overclock the system, the user will have to increase the multiplier, which will finally increase the clock speed.

The user can raise the multiplier settings to their choice to increase the clock speed. After that user will have to enable the changes to the system to complete the process to allow a change in the multiplier. After completing this user can save their BIOS or UEFI settings and exit. Then user has to boot back to their main Operating System. The user can then use the CPU-Z to check the new clock speed of the CPU.
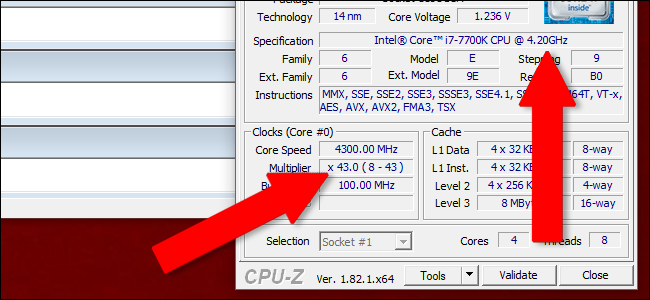
NOTE: However if user sees lower Core Speed and Multiplier, then they have to do a more stressful operation. User have to again start the stress test to make sure that CPU is working at its maximum speed.
In order to do so, the user can follow the Step II again to run the stress test again. However, if the system is stable with the higher CPU frequency, then the user can again follow Step III to increase the multiplier again. The user can set it as high the system can allow (user can check it through Google). But the user should do it slowly and more precisely.
At last, the user will reach a stopping point as either the system will crash while stress testing or the stress test will fail.
Step IV: Repeating Step III until failure and then boosting the voltage:

After stress test fails, or it causes a crash to the system but the system’s temperature can still go up a little bit, the user can continue overclocking the Intel Processor. However, now the user will have to overclock by increasing the CPU’s voltage. The user will have to boost the voltage that will be delivered by the motherboard to the CPU through the power supply. This will allow the CPU to stabilize at faster speeds, although the system’s temperature will increase significantly in this process.
In order to boost the CPU voltage, user has to once again go to the BIOS Settings. Then user has to go to the M.I.T > Advanced Voltage Settings > CPU Core Voltage Control.

Here the user has to do same, boost the voltage by a small amount and then repeating Step II and Step III until the system crashes. The recommended step up for voltage is 0.05 volts in one step. While the process is going on, the user will have to keep an eye on the temperature as it will keep on increasing. If the test fails after some steps, then it means that user cannot increase voltage by more.
The user will have to repeat Steps III and IV in a round robin. The user should increase the multiplier then do a stress test repeating the process until system crashes. After system crash user can boost the voltage then do a stress test and repeating it again until system crashes. Finally, the user will reach a point when the temperature will reach the maximum level, or the stress test of the system fails again and again. If it happens, the user should go to the last stable overclock to make sure that system works well.
Step V: The Final Test:
When the user will reach the point where the clock speed is stable, then user have to perform one last extremely thorough and effective test. Here, the user has to check whether the PC is running well at the new higher clock speed and voltage consistently.
For doing so, the user will have to turn ON the power saving mode again. Then set up the stress test program to run continuously for some time. The stress test should run for several hours at least so that the hot temperature inside the PC stabilizes. If the PC handles it properly without processor getting too hot or the test failing or the system crashing it means that the overclocking is stable.
Video tutorial to overclock any Intel Processor/CPU
This is all about overclocking the speed of an Intel Processor. Users can easily do it by following the steps as it is not a very tough task. However, the users will have to be very careful while doing so, as a small mistake may cause some issues in the system. I hope that user will find this tutorial helpful in overclocking the speed of the processor.